Red light therapy stand: complete setup guide
Everything you need to know about choosing, positioning, and using a red light therapy stand for optimal results at home. Types, recommendations, and setup tips.
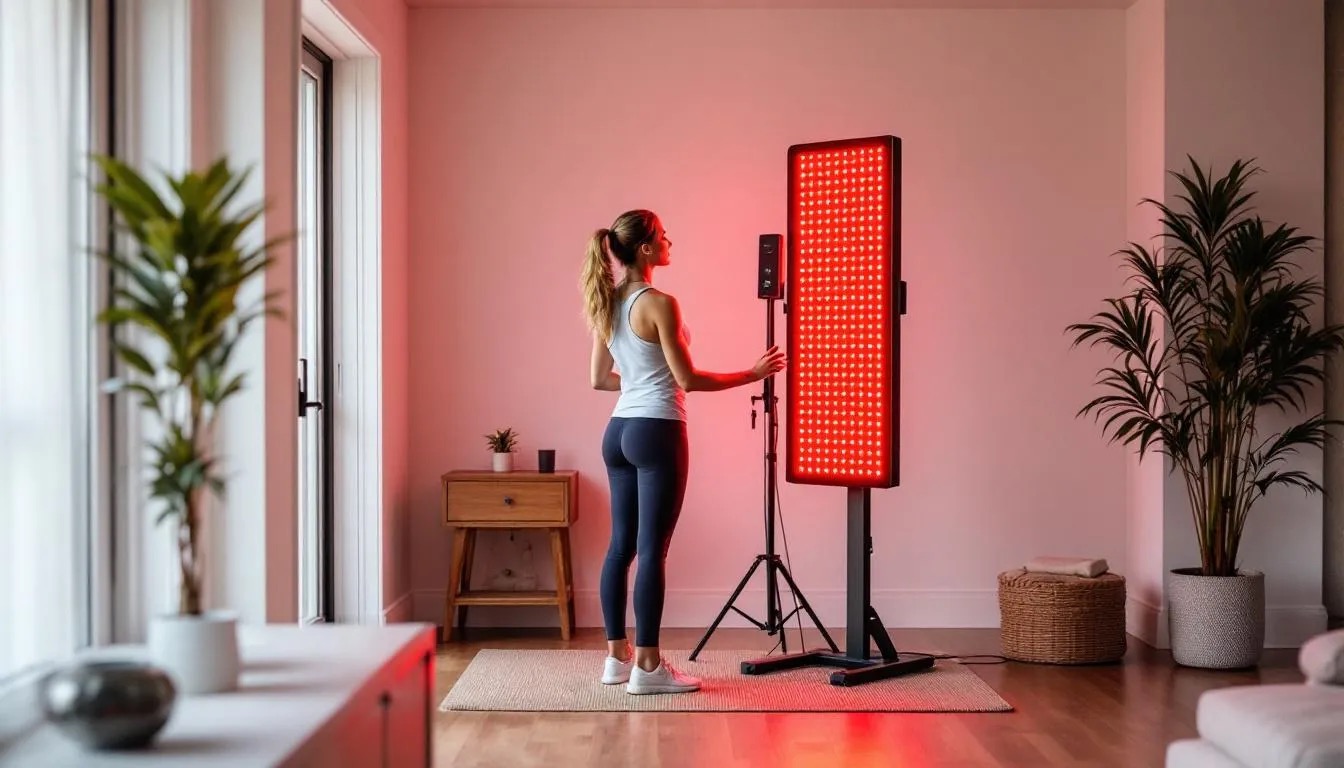
You bought the panel. It showed up in a box the size of a small refrigerator. And now it's leaning against your bedroom wall, propped up at a weird angle, delivering maybe 60% of the therapy it could if you actually had a proper stand.
This is one of the most common mistakes in home red light therapy. People spend hundreds of dollars on a quality panel and almost nothing on how to position it. Then they wonder why their results plateau. The stand is not an afterthought. It's part of the protocol.
Getting this right means consistent distance, consistent angle, and the ability to treat different body parts without awkward contortions. It means hands-free sessions. It means your panel is positioned at the exact height and angle that delivers maximum irradiance to the target tissue, session after session, without you holding it, leaning it, or asking someone else to hold it steady.
This guide covers everything: stand types, how to choose the right one for your panel and your goals, optimal positioning principles, specific product recommendations across different budgets, DIY options, and how to set up a proper at-home therapy space. Whether you're treating joint pain, working on hair regrowth, targeting hyperpigmentation, or just using red light for general wellness, your stand matters more than you think.
Why your stand setup matters
Most people assume red light therapy is simple: stand near the panel, do your time, done. And in theory, that's true. But the details of that "stand near" are where the therapy actually lives.
Red light and near-infrared light follow an inverse square law. Double the distance from the panel, and you don't get half the intensity. You get one quarter. A session at 12 inches delivers four times the irradiance of a session at 24 inches, all else being equal. So if you're wobbling around at inconsistent distances because your panel is propped on a chair or balanced against the wall, your dosing is inconsistent too.
That's a problem. Treatment time and dosing are calibrated to specific distances. Most manufacturers test their irradiance specs at 6 inches and 12 inches. If you're somewhere between 9 and 18 inches because your setup is improvised, you're not delivering the dose you think you are.
Then there's the angle issue. Flat panels emit light perpendicular to their surface. If your panel is tilted, you're not getting full perpendicular irradiance to the target tissue. You want the panel parallel to the skin surface, facing it directly. A good stand makes this trivial. A bad setup makes it impossible.
And finally, there's consistency. The real power of at-home red light therapy is the ability to do it daily, or nearly daily. That only happens when the setup is easy. If you have to drag equipment out of a closet, prop it up, adjust it, and stand there holding it steady, you'll skip sessions. Simple stands create simple habits.
SeekRedLight has reviewed dozens of home therapy setups, and the pattern is clear: people with dedicated, properly mounted stands are far more consistent with their protocols than people without them. Consistency drives results. Your stand enables consistency.
What types of red light therapy stands exist
There are five main categories. Each has a different use case, and the right one depends on your panel size, your treatment goals, and how you use your space.
Adjustable floor stands
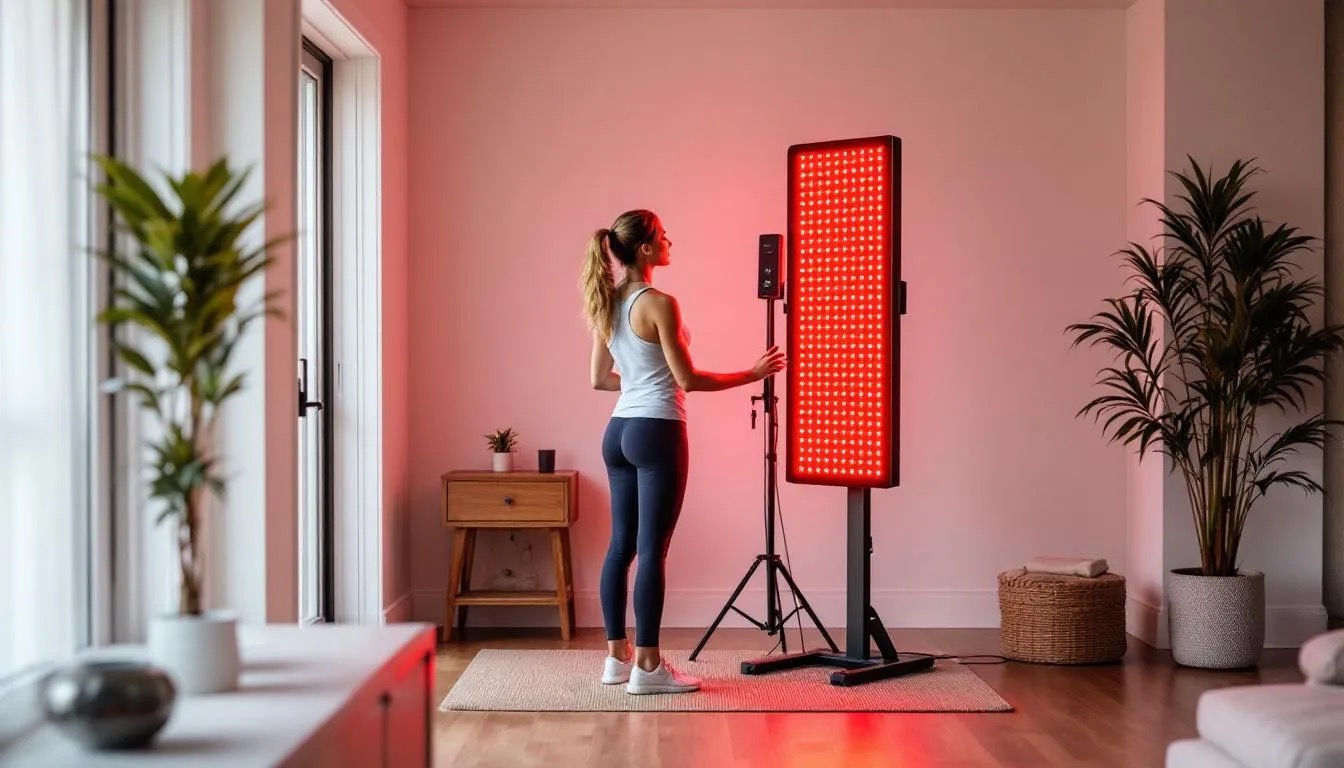
These are the workhorses. A telescoping pole on a wide base, usually with a hook, bracket, or clamp at the top where the panel hangs. The pole adjusts from roughly 5 feet to 7 feet in height, letting you position the panel anywhere from low (treating legs and feet) to high (treating head and neck).
Most panels come with a hanging hook built into the top. Floor stands with a simple hook system are therefore the most universally compatible option. The panel hangs by the built-in loop, the stand handles the weight, and you're done.
Floor stands are the default recommendation for most panels in the small-to-medium range, say 12 inches wide by 24 inches tall up to 12 by 48 inches. For these sizes, a good floor stand in the 12 to 20 pound weight capacity range works perfectly.
The main limitation: stability. Cheap floor stands with narrow bases wobble. If you have kids or pets, or if you're doing movement-based sessions where you're walking toward and away from the panel, stability matters. Look for wide-base designs and avoid anything that feels flimsy at the base.

Heavy-duty stands for full-body panels
Full-body panels are a different situation. We're talking about the large panels: 24 by 48 inches, dual stacked panels, anything over 30 pounds. These need stands rated for the weight, with more robust support systems.
Heavy-duty floor stands often use a crossbar at both top and bottom, or a bracket system that attaches at multiple points on the panel rather than a single hook. Some use tension-based systems where the panel is sandwiched between two poles, like a music keyboard stand but much sturdier.
For full-body setups, also consider the footprint. A wide, stable base for a heavy panel takes up real estate. If you're treating in a small bedroom or bathroom, measure your floor space before buying.
The weight capacity rating is your primary filter here. Don't cut corners. A full-body panel dropping because the stand failed is not a minor inconvenience.
Door-mounted systems
Smart option for small spaces. A door mount uses an over-door hook or a clamp that attaches to the top of a door, letting the panel hang in a doorway at whatever height works for your treatment.
Door mounts are affordable, take up zero floor space when not in use, and convert any doorway into a quick therapy station. The downside: the panel is fixed at door width, which may not be where you want it. If your doorway isn't in a convenient spot, this gets awkward. And while door mounts work fine for small and medium panels, they're not built for heavy full-body setups.
They're a great option if you're treating one specific area consistently, especially face and neck or hair growth on top of the head where a hanging position works naturally.
Wall-mounted brackets
Fixed, permanent, clean. A wall bracket attaches to a stud (or with appropriate anchors), and your panel mounts to the bracket at a specific height and angle. Some brackets are fixed; others include adjustment for angle and extension distance from the wall.
Wall mounting is the optimal solution if you have a dedicated therapy space, which we'll discuss in detail later. The panel is always in position, always at the right height, and there's nothing to set up or put away. You walk in, turn it on, stand at your marked distance, and treat.
The investment is minimal: a couple hours of work and a bracket that costs $20-50. The payoff is the most consistent, professional home setup possible.
Wall mounting works best for panels in the 12 by 24 to 12 by 48 range. For heavier panels, make sure you're going into studs and using brackets rated for the weight. Consult a basic load-bearing chart if you're not sure.
Tabletop and desktop stands
For small panels targeting the face, these sit on a desk or table and let you do hands-free facial treatments. If you're using a handheld wand or a small facial panel, these are often included with the device.
The considerations here are angle adjustment and height. You want to be able to position the panel level with your face when seated comfortably, not craning your neck up or tilting your face awkwardly down. Tabletop stands with full 360-degree tilt adjustment are worth the small premium.
For facial red light therapy targeting skin rejuvenation, wrinkles, and collagen production, a quality desktop stand is all you need. Many people start with facial treatment and then expand to larger panels later. If that's your path, starting with a good desktop stand makes sense.
How to choose the right stand for your setup
Choosing wrong means returning things, wasting money, or settling for a suboptimal setup. Let's get it right the first time.
Step 1: Know your panel's weight and attachment points. Every panel has a weight, usually listed in the specs. It also has a specific hanging mechanism, typically a loop at the top, two holes at the top corners, or a dedicated bracket slot. Note both before shopping.
Step 2: Match stand capacity to panel weight, with margin. If your panel weighs 15 pounds, don't buy a stand rated for 15 pounds. Buy one rated for 20-25 pounds. Continuous loading at capacity fatigues materials. Leave headroom.
Step 3: Consider your primary treatment targets. Treating your face? A door mount or tabletop stand might be enough. Treating your full back and glutes? You need height range and probably floor mounting. Treating your feet and lower legs? You need the panel to hang low. Make sure your stand's adjustment range covers your full intended treatment zone.
Step 4: Think about your space. Measure. Seriously. A wide-base floor stand takes up meaningful floor space. A door mount is only useful if you have a convenient door. A wall mount requires wall access. Know your constraints before ordering.
Step 5: Consider how often you'll move it. If your stand lives in one spot permanently, stability and durability are your main concerns. If you're moving it room to room or traveling with it, portability matters: weight, folding ability, and whether it packs down to a manageable size.
Optimal positioning principles
The stand is a delivery mechanism. What it delivers, and how well, depends on where and how you position it. These principles apply regardless of which stand type you use.
Distance from the panel
Distance is the most important positioning variable. And unlike angle, which has some tolerance, distance directly determines how much energy you receive per square centimeter of skin.
For most consumer-grade panels:
- 6 inches: Very high irradiance, used for conditions requiring deeper tissue penetration. Short treatment times, typically 3-5 minutes.
- 12 inches: Standard treatment distance. Balances good irradiance with comfortable even coverage. The sweet spot for most protocols, 10-15 minutes.
- 18-24 inches: Lower irradiance. Better for full-body coverage from a single panel. Longer treatment times required, 15-20+ minutes.
Check your panel's spec sheet for irradiance at each distance. Some brands publish these numbers; others don't. If your brand doesn't, that's a red flag worth noting.
Mark your optimal distance on the floor with tape. Some people use a small piece of colored tape at 6 inches and another at 12 inches. This sounds obsessive. It isn't. It's just good protocol hygiene that makes every session consistent without guessing.
Panel height
Your panel should be positioned so the center of the panel aligns with the center of the treatment area. If you're treating your chest and abdomen, center the panel at mid-torso. If you're treating your face and neck, center it at face height. If you're treating your lower back and hips, center it at waist height.
For a full-body session where you want to cover everything, you'll typically do multiple positions anyway, starting with the front of the body and then turning around for the back. In that case, center height at mid-torso works well for most of the session.
For scalp and hair treatments, positioning overhead can be tricky with a standard floor stand. Some people angle the panel tilted slightly downward. Others use a dedicated overhead mount or lie on a treatment table under the panel. Worth thinking through if scalp is a primary target.
Angle and perpendicularity
The panel face should be parallel to the skin surface receiving treatment. If you're standing facing the panel, it should face you straight on, not angled up or down. Off-axis light delivers less irradiance to the surface. It also means the beam is spread across more area at an angle, reducing energy density even further.
A few degrees of tilt is fine. Significant tilt, say 20-30 degrees off perpendicular, meaningfully reduces effective dosing. If your stand is wobbly or doesn't hold its angle well, this becomes a problem.
Eye protection
This deserves a dedicated mention. Red light therapy panels are bright. Even if they're not classified as laser devices, the intensity can cause eye discomfort or harm with repeated direct exposure.
Whether you need eye protection for red light therapy depends on the device and your session parameters, but the default recommendation is yes, especially for sessions at close range. There are specific ocular eye shields designed for this, as well as red light therapy goggles and full-block glasses that block all wavelengths. Also worth understanding: whether to keep eyes open or closed during treatment is its own topic with nuance worth reading about.
Your stand positioning affects your eye exposure too. If the panel is centered at face height during a torso treatment, it's pointing at your face. Either use eye protection or position the panel lower so it's not aimed directly at your eyes during full-body sessions.
Stand recommendations by use case
Let's get specific. These aren't exhaustive reviews, since products change and availability varies, but they give you a framework for evaluating what's available when you shop.
For small to medium panels (under 20 lbs)
Photography light stands. Yes, really. The same adjustable aluminum stands used by photographers to hold studio lights are perfect for hanging red light panels. They're adjustable from roughly 4 to 7 feet, rated for 10-20 pounds depending on the model, and available for $30-60. The panel hangs from the same swivel light mount adapter used for studio lights.
Look for stands with a 5/8-inch stud at the top (the industry standard). Most panel manufacturers either include or sell a compatible hanging bracket. If not, the threading is standard enough that you can find adapters.
Photography stands fold down to a compact tripod shape, making them easy to store and move. They're stable enough for standard use. In a house with pets or rambunctious kids, consider whether the three-leg tripod design is stable enough for your situation.
Retractable background stands. Another photography gear crossover. These use a horizontal crossbar supported by two adjustable poles. You can hang the panel from the crossbar at its midpoint. This works particularly well for wider panels that have two attachment points, since the crossbar lets you distribute the weight evenly.
Background stand sets typically cost $40-80 and include the poles and crossbar. They're designed for fabric backgrounds and work equally well for panels. Stability is good because of the wide foot spread.
For large panels and full-body setups (20-60 lbs)
Heavy panels need serious support. Consumer photography stands typically max out at 20-25 pounds. If your panel is heavier, you need specifically rated equipment.
Heavy-duty speaker stands. PA speaker stands, used to elevate speakers at concerts and events, are rated for 100+ pounds in many cases and are extremely stable. They're also tall, adjusting to 6-7+ feet. They use a different mounting system (pole mount, not a hook), so you'll need to fabricate or buy an adapter to hang the panel, but this is usually a simple bracket situation.
Custom fabricated stands. For serious home setups with large or stacked panels, some people hire a local welder to fabricate a custom wall or floor stand rated for their specific load. This costs $100-300 depending on complexity but results in a perfectly sized, perfectly rated solution.
Panel-specific stands. Several major red light therapy brands now offer their own branded stands designed specifically for their panels. Joovv, Platinum LED, Mito Red Light, and Hooga have all released stands at various price points. These are the easiest option because compatibility is guaranteed. They're not always the cheapest option.
For facial and desktop treatment
Tabletop adjustable arm stands. These look like a ring light stand but smaller. They grip the desk or table with a C-clamp, then extend an articulating arm that holds the panel. Full 360-degree tilt. Very stable. Good for panels under 5 pounds.
Phone/tablet holder styles. For very small facial panels or wand-style devices, clip-on phone mount stands work fine. They're cheap, adjustable, and free up your hands.
Simple angle-adjustable stands. Some small facial panels come with their own kickstand-style bases. If yours does, check whether the angle adjustment is actually useful or just a fixed 70-degree tilt that doesn't suit your sitting height.
DIY stand options
Not everyone wants to spend another $50-100 on a stand. Fair enough. These DIY approaches work for different situations.
The PVC pipe stand
For medium panels, a PVC pipe frame costs $20-30 in materials and takes about an hour to build. The design: two vertical pipes weighted at the base (either filled with sand or connected to heavy base pieces), with a crossbar at the top. The panel hangs from the crossbar via its built-in hook.
PVC isn't glamorous, but it's functional, adjustable by cutting pipes to different lengths, and easily repaired or modified. It's also lightweight, which is a pro if you're moving it but a con for stability with heavy panels.
The wall anchor approach
If you're handy and your living situation allows it, a simple wall-mounted hook, screwed into a stud with appropriate hardware, is as functional as a $200 stand system for panels under 20 pounds. Some people add a simple height-adjustable element by installing two or three hooks at different heights and moving the panel between them.
This is decidedly low-tech but works perfectly well. The panel always hangs level, it's always at the right distance from the wall (assuming you stand at the same spot), and there's nothing to fidget with.
The door hack
Over-door hooks, the kind meant for hanging robes, work for small to medium panels if the door is in a convenient location. The panel hangs from the hook. You stand facing the door at your measured distance. This costs $5-10 and works surprisingly well as a starter setup.
The main drawback beyond the ones already mentioned: door hooks can shift if the panel is heavy, and the panel swings if you brush against it. Not a disaster for a 10-pound panel. More of a problem for anything heavier.
Repurposed furniture
A heavy bookshelf with a hook at the top edge. A towel rack with the panel hanging off it. An IKEA stand of some kind repurposed for the job. People get creative, and many of these solutions work fine.
If you go this route, think about weight-bearing. Furniture isn't always rated in obvious ways, and you don't want a panel crashing because a shelf bracket failed. Check that whatever you're hanging from is actually attached to a stud or is structurally solid on its own.
Setting up a dedicated therapy space
If you're serious about red light therapy as part of your ongoing health practice, a dedicated space pays dividends in consistency. Here's how to build one.
Choosing your room
Bathrooms work surprisingly well for many people. The contained space means the light bounces around a bit (though this doesn't add meaningful therapeutic benefit), the setup is private, and it's easy to build a routine around an existing daily behavior like showering. The downside: humidity and small size. Full-body panels need space.
Bedrooms are the most common dedicated space. You can mount the panel on one wall, keep your distance marker tape on the floor, and walk in before bed or in the morning for your session. Easy, consistent, and convenient.
Home gyms and basements are ideal for large or multi-panel setups. The panel can be wall-mounted at a permanent position, you have space to move around it, and the space is already dedicated to health and body work.
Dedicated closets. Some people, particularly apartment dwellers, have converted large closets into therapy spaces. The panel on the back wall, distance marked on the floor, and the closet doors closed for privacy. Works well for small to medium panels.
The floor distance marker system
Once you've chosen your wall or stand position, tape the floor. Use colored tape, with one color for 6 inches and another for 12 inches from the panel face. Some people add a third mark at 18 or 24 inches for longer, lower-intensity sessions.
This takes 5 minutes and makes every subsequent session automatic. You walk in, stand on your tape line, turn on the panel, done. No measuring, no guessing, no inconsistency.
Lighting and ambiance
This is optional but worth mentioning. Many people find that pairing their red light session with a calming environment improves the experience and makes them more likely to continue the habit. Dimming other lights so the red glow of the panel is the primary light source creates a specific feeling that a lot of people come to associate with relaxation.
Red sleep light bulbs in a nearby lamp can complement the therapy space aesthetic while also being useful before bed. Red light strips can add ambiance to a converted closet or dedicated room. These aren't therapeutic additions to your red light panel session, but they create an environment that supports the habit.
Combining with other modalities
Red light therapy pairs well with other practices. Some people do sessions before or after yoga or stretching. Others use their infrared sauna before or after red light therapy, treating them as complementary modalities. After microneedling, red light accelerates healing. After exercise, it supports lymphatic drainage and muscle recovery.
Whatever you're pairing it with, your stand setup should accommodate the workflow. If you do mobility work and then red light therapy, can you easily access the panel after finishing your floor stretches? Positioning the panel in your workout area, or at least making it easy to get to from there, removes friction from the combined routine.
Stability and safety
These aren't dramatic risks, but they're real considerations, especially with heavier panels.
Weight rating compliance is non-negotiable. If the stand is rated for 20 pounds and your panel weighs 25 pounds, you're either getting lucky or you're setting up a future failure. Exceeding weight ratings doesn't just risk a crash; it fatigues the stand, making it progressively less reliable over time.
Floor protection. Heavy floor stands can scratch hardwood floors or leave marks on vinyl. Felt pads under stand feet prevent this. Worth the $5.
Kids and pets. Full-body panels are tall, somewhat top-heavy, and attract curiosity. If you have small children or large dogs, either secure the stand to the wall with a safety strap (the same kind used for earthquake-proofing bookshelves) or make sure the therapy space is inaccessible when unsupervised.
Electrical considerations. Your panel draws real power. Most are 100-300 watts. Make sure you're not overloading an outlet or extension cord. Panels should ideally plug directly into a wall outlet rather than a power strip, especially if the strip is already loaded with other devices.
Heat management. Red light panels generate heat, mostly at the diodes themselves. Keep the panel in a ventilated area and don't position it directly against a wall or in an enclosed space without airflow. This matters less for consumer panels than for commercial equipment, but it's still good practice.
Connecting your stand to your protocol
Your stand isn't just infrastructure. It's a tool that enables your protocol. Let's connect the two.
Whole-body front and back sessions
The most common full-body approach is a two-phase session: front body facing the panel, then turn around for back body. The stand height should be set so the panel center aligns with your mid-torso, which works reasonably well for both phases.
For front-of-body sessions targeting the chest, abdomen, and thighs: center at belly button height. For back sessions targeting the upper and lower back, same position. For glutes and hamstrings, you might angle or reposition slightly lower.
Fat loss protocols typically focus on the torso and require consistent coverage. Body contouring sessions may require repositioning for targeted areas.
Targeted treatment sessions
If you're targeting a specific condition, you'll often position the panel differently for each session.
For joint pain, the panel should be positioned so the center is directly facing the affected joint. Knee pain: panel at knee height. Shoulder pain: panel at shoulder height. Lower back: panel at waist height.
For peripheral neuropathy affecting the feet and calves, the panel needs to be low, or you need to sit and position the panel at foot height. This is an area where a floor stand that goes very low, or a tabletop setup with the panel near the floor, is particularly useful.
Plantar fasciitis treatment works best with the panel close and aimed directly at the sole. Sitting with feet up toward the panel, or having the panel positioned low and angling upward, works better than a standard standing setup.
For hair loss treatment, panels positioned overhead or at a downward angle toward the scalp, with the user seated below, are sometimes used. Some people build simple ceiling mounts for this purpose. There are also dedicated scalp panels and caps designed to eliminate the stand problem entirely.
Eye and face sessions
Facial treatment sessions are a separate category. Whether you're targeting skin rejuvenation, hyperpigmentation, or overall facial anti-aging effects, you're typically doing this seated with a small panel on a tabletop or with a larger panel at face height.
Remember that eye protection is important for these sessions. Use appropriate eye shields or protective glasses. And whether you keep eyes open or closed during the session affects exposure, so know what you're doing before you start.
After treatments and procedures
If you're using red light therapy after surgery or to accelerate recovery from a procedure, your stand positioning may need to accommodate limited mobility. Someone recovering from knee surgery who can't easily stand up needs a different setup than someone doing routine maintenance therapy. Tabletop setups, or panels positioned so you can treat while seated or lying down, become much more important in these situations.
SeekRedLight's coverage of lymphatic drainage and recovery protocols gets into the positioning specifics for different recovery scenarios. Worth reading if this is your use case.
Maintaining your stand
Low-maintenance, but not zero-maintenance. A few things to check periodically:
Tightening joints and bolts. Telescoping stands and adjustable brackets loosen with use. Every few weeks, check that all adjustment points are properly tightened. A panel that gradually drifts lower because the adjustment collar isn't locked is a sign that maintenance is overdue.
Checking weight capacity over time. Aluminum and plastic components fatigue. A stand that felt solid at 18 months might have stress cracks developing at 24 months, especially at high-use pivot points. Visually inspect your stand periodically, particularly if you're using it at or near its weight capacity.
Cleaning. Dust accumulates on stand surfaces, and if your panel runs warm, that can bake dust into crevices. Wipe down with a damp cloth occasionally. Don't use harsh cleaning products near the panel itself.
Cord management. Your panel has a power cord. Your stand doesn't manage it for you unless you actively route it. A cord hanging loose on the floor is a trip hazard and looks messy. Cable ties or Velcro straps routed along the stand pole keep things clean and safe.
Comparing stand types: a quick reference
| Stand type | Best for | Price range | Portability | Stability |
|---|---|---|---|---|
| Photography floor stand | Small-medium panels up to 20 lbs | $30-80 | High (folds flat) | Medium |
| Background stand (crossbar) | Medium panels with two attachment points | $40-80 | High | Medium-High |
| Heavy-duty speaker stand | Large panels over 20 lbs | $60-150 | Low-Medium | Very High |
| Brand-specific stand | Any, paired with same brand panel | $80-200 | Variable | High |
| Door mount | Small-medium panels, tight spaces | $15-50 | Very High | Low-Medium |
| Wall mount bracket | Any panel, dedicated spaces | $20-60 + installation | None | Very High |
| Tabletop arm stand | Facial panels under 5 lbs | $20-60 | High | High |
| DIY PVC frame | Small-medium panels, budget setups | $20-30 | Medium | Low-Medium |

Common mistakes and how to avoid them
People make the same stand-related mistakes repeatedly. Here's what to watch for.
Buying the stand before knowing the panel specs. Panel weight and attachment points vary dramatically. A stand that's perfect for one panel won't work for another. Always know your panel's weight and mounting style before purchasing a stand.
Underestimating stability needs. The cheapest floor stand option is often fine in theory but wobbles in practice, especially if you're moving toward and away from the panel repeatedly in a session. If the stand rocks when you tap it lightly, it's going to cause problems.
Ignoring height range. Some stands don't go as low as you need for foot and leg treatment, or don't go as high as you need for overhead scalp sessions. Check the full adjustment range, not just the maximum height.
Not locking adjustments. All telescoping stands have locking mechanisms. Many people forget to lock them, or the locks loosen over time. A panel that slowly sinks during a session is delivering inconsistent dosing to inconsistent body areas.
Treating the stand as an afterthought. As we said at the start: this is the equipment that determines whether your $400 or $800 or $1,500 panel works consistently. It deserves a real budget allocation, typically $40-100 for most setups, and genuine thought about what your specific situation needs.
Frequently asked questions
What stand does red light therapy panel manufacturers recommend?
Most manufacturers recommend their own branded stands, which is convenient but not always the best value. Photography-style adjustable floor stands and background stands are often just as effective for a fraction of the cost. The exception is for very heavy full-body panels over 30 pounds, where a brand-specific stand may be the safest option.
Can I hang my red light therapy panel from the ceiling?
Yes, with appropriate hardware. Ceiling mounts are particularly useful for treating the top of the head during hair loss protocols. Use a proper ceiling hook that goes into a joist, not just drywall anchors, and make sure the mounting hardware is rated for well above the panel's weight. Most consumer panels can safely ceiling-mount this way.
How stable does a red light therapy stand need to be?
Stable enough that it won't tip over if bumped. Most people tip it slightly during sessions, walking toward and away from the panel. The stand should stay planted when you do. For heavy panels, this means wide-base stands or wall mounting. For lighter panels, most adjustable stands work fine.
Can I use a music stand for red light therapy?
Not a standard music stand, no. They're too short and not designed to bear that kind of weight. However, speaker stands, which are in a similar product category, often work well because they're height-adjustable and built for heavier loads.
Does the type of stand affect the therapy results?
Not directly. The stand itself doesn't change the light output. But the stand determines whether you consistently achieve the right distance and angle. In that indirect sense, yes, a better stand produces better results because it enables better consistency. Treatment time guidelines assume you're at the right distance. If you're not, the guidelines don't apply.
How much should I spend on a red light therapy stand?
For small to medium panels, $40-80 is the typical range for a good standalone floor stand. For heavy full-body panels, budget $80-150 for a quality rated stand or $40-80 for a wall-mount professional installation. Spending less than $30 usually means getting something that wobbles, has poor adjustment locking, or isn't rated for your panel's weight. Spending more than $200 is rarely necessary unless you're buying a brand-specific stand for a premium panel.
What if my panel didn't come with a stand?
Most panels don't include a stand. They include a hanging hook or bracket at the top and sometimes a door mount kit. For anything beyond a door mount, you'll need to source a stand separately. Start with a photography floor stand or background stand system, both available from major retailers, and adapt from there if needed.
Can I build a stand myself?
Absolutely. PVC pipe stands are the most common DIY approach and cost $20-30 to build. Wall mounts from hardware store components are another option. The main requirements: correct weight rating for your panel, stable base, and adjustment range that covers your treatment targets. See the DIY section above for specifics.
Related guides
- How long to do red light therapy: dosing explained
- Do you need eye protection for red light therapy?
- Red light panel vs mask: which is right for you?
- Red light therapy beds for home use
- Can you do too much red light therapy?
Sources
- Hamblin MR. Mechanisms and applications of the anti-inflammatory effects of photobiomodulation. AIMS Biophysics, 2017
- de Freitas LF, Hamblin MR. Proposed Mechanisms of Photobiomodulation or Low-Level Light Therapy. IEEE Journal of Selected Topics in Quantum Electronics, 2016
In case I don't see you, good afternoon, good evening, and good night. May your stand hold steady, your distance stay consistent, and your sessions build into the results you're working toward. Explore SeekRedLight for comprehensive guides and tools to get the most out of your red light therapy practice.